Home Inspection Geeks
  • Home
  • Your Inspection
    • Single Family Homes
    • Condo Inspections
    • Multi-Unit Inspections
    • Commercial Building Inspections
    • Radon Testing
    • Your Report
  • Pricing
  • About
  • Areas We Serve
    • Aurora, IL
    • Chicago, IL
    • Evanston, IL
    • Naperville, IL
    • Northbrook, IL
    • View All Service Areas
  • Blog
  • Contact
  • Book Now
  • Menu Menu

Should I Drywall My Garage

Home improvement

People use the garage for a variety of things: storage, park cars, and some people turn it into a room that someone would live in or entertain in.  Whatever your plans are for the garage, should you drywall the garage or detached garage? Yes, if it is something you are interested in doing.

Let’s take a look at why this is important, why drywall a detached garage, what to do when the drywall is up, using plywood, starting with an unfinished garage, maintenance, and when to call a professional.

Why This is Important

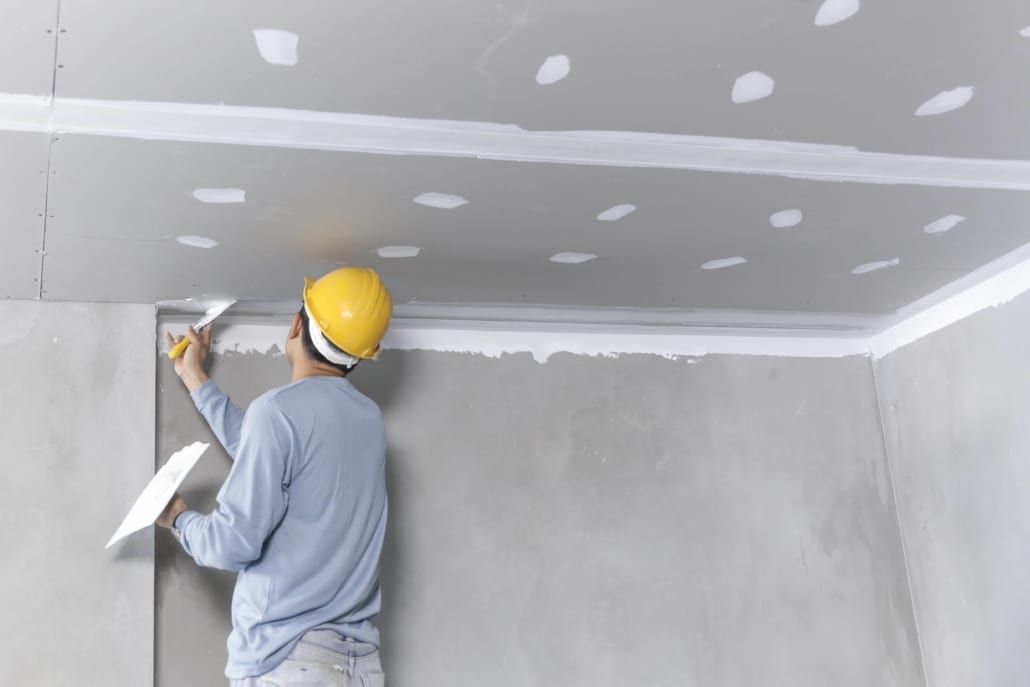
Drywall is treated gypsum and used to finish walls and ceilings in a home. A material that is used in building modern homes, it is also used to convert the garage into a room to entertain or other uses.

Why Drywall a Detached Garage

Protects From Fire

Drywall is a great building matter that is highly resistant to fire so it is a great addition to garages.  Garages often have power tools in them, flammable materials, and also people who work on cars with products that could catch fire. Installing drywall would be a good idea to keep it a safe area.

Helps With Noise

Is there a lot of noise that comes from the garage such as people watching a live football game on TV, playing foosball, or your child has a rock band that uses the garage?  The drywall will help reduce the noise that is heard.

Visibility and Lighting

Visibility and Lighting

The white color of drywall shows up nicely in the garage as it maximizes the lighting and reflects well in the room.

Resell of the home

It is difficult to carry the drywall so you need others to help.  It is heavy but once you get it installed, it looks great!  Many buyers like to see drywall on the detached garage as they can use the room for various activities and they don’t have to spend the time doing it themselves!

Make An Old Garage Look New

Some people will drywall the garage because it is old and they don’t want to replace it.  This gives the area a new look and hides the cosmetic issues.

The Drywall is Up, What Now

Using a Stud Finder

Once you are done installing the drywall, you can use a stud finder to find the wall stud.  You will need this wall stud (spaced 16-24 inches apart) to safely hang items.  You cannot hang items in the hollow drywall, they will fall down.  If you don’t have a stud finder, you can knock on the wall to find the studs.

Weight to Hang on the Walls

You can hang up to various weights on the wall.  How much weight can drywall hold? Over 100 pounds!  For example, if you want to hang your prized NFL jerseys, you can use a screw and an anchor to put into the stud and to provide the support for up to 20 pounds.  However, if you were hanging a shelf with football helmets on it, you can hang up to 100 pounds with #4 or larger screws.  Depending on what you are hanging is the size of the screws or anchors that you need.

Plywood is another choice

Plywood is Another Choice

Some people find that using plywood is better.  This is because it is stronger and better for tools and storing equipment. It is also easier to hang than drywall because it is not as heavy. Lastly, you can drill right into it and don’t need to look for studs like you do with drywall.  Some like the look of the plywood while some like drywall. However, plywood is not fire-rated and an attached garage should always be protected with fire-rated materials.

Starting With an Unfinished Garage

Make sure the garage is ready and has the following:

  1. Sometimes there may not be enough wall studs to drywall.  Adding the blocks will be necessary so you have the support needed.

2. If you plan to hang lights or bicycle hooks, you will need to add nail blocking.

3. If you have an attic hatch, make sure you add an opening to the drywall so you can access it and the attic ladder.

4. Are you adding skylights or a window AC unit? Cut out a space in the drywall to do this.

Adding or Moving Wires in the Garage

If you are adding wires and electric, consult a professional to help with this. Safety should be a priority.

Moving Wires

You will probably need to move wires to other places.  If you aren’t sure how to do this safely, contact a professional.

Ventilate the Garage

You want your garage to have air that flows freely and stays cool. Having enough attic and roof vents is important.  The rule is total of 1 sq. ft. (144 sq. in.) of vent opening per 300 sq. ft. of attic divided between the soffit and roof vents.  Here are some great instructions about how to insulate the walls.

Add Insulation

After the drywall is done, blowing in insulation is the next step.  You can buy this at a local hardware store and contact a professional if you need help.

Weather strip doors and windows

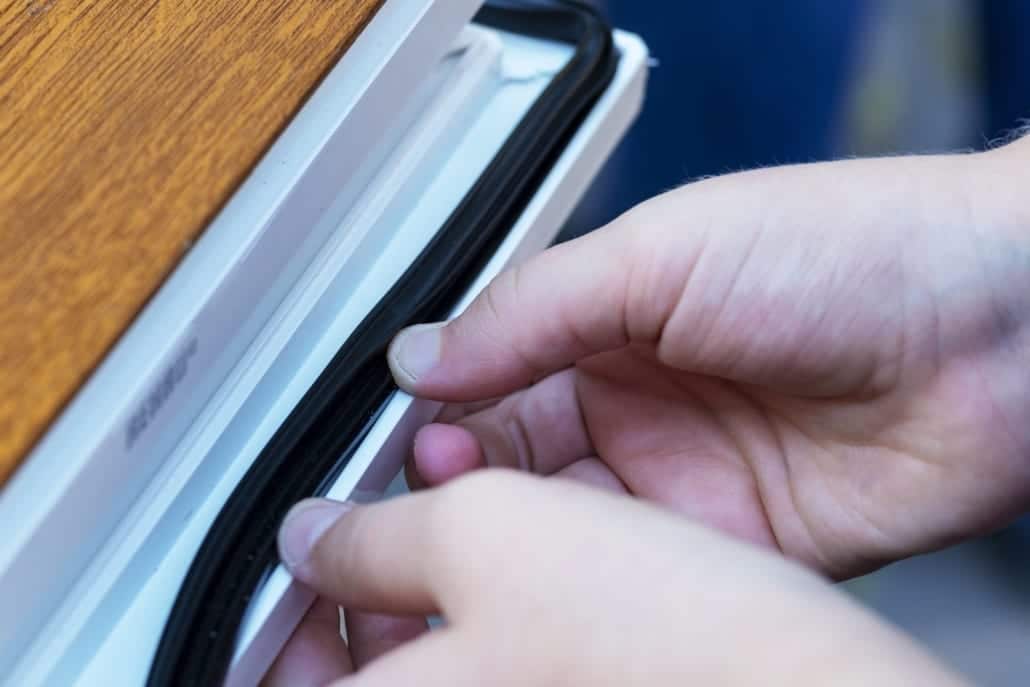
Weather Strip Doors and Windows

Make sure there are no drafts from the windows or doors in the garage. Installing weather stripping is important so you can keep your air and heating bills low. The garage can experience heat or air loss so putting weather-stripping on the door is a good idea. Then drywall is the last part.  You may want to rent a drywall lift that will allow you to put the drywall on the walls and the ceilings.  It will make your job easier.

Maintenance in the Garage

1. If you have recessed lighting or skylights, make sure there is enough sealant around them so air is not escaping.

2. A garage door opener should last about 10 to 15 years, while a garage door should last 15-30 years with proper maintenance. 

3. Keeping the rollers, door tracks and springs lubricated, garage door balanced, and door sensitivity adjusted are great ways to get the most amount of years out of the garage door and openers.

4. Clean window ac unit – often a window AC unit must be added to a garage.  Maintaining this is important.  There are ways you can clean the window AC unit and do this with or without removing it from the window.  Additionally, cleaning the filter, coils, fins, pan, and fan are all-important.

Don't overload the circuit

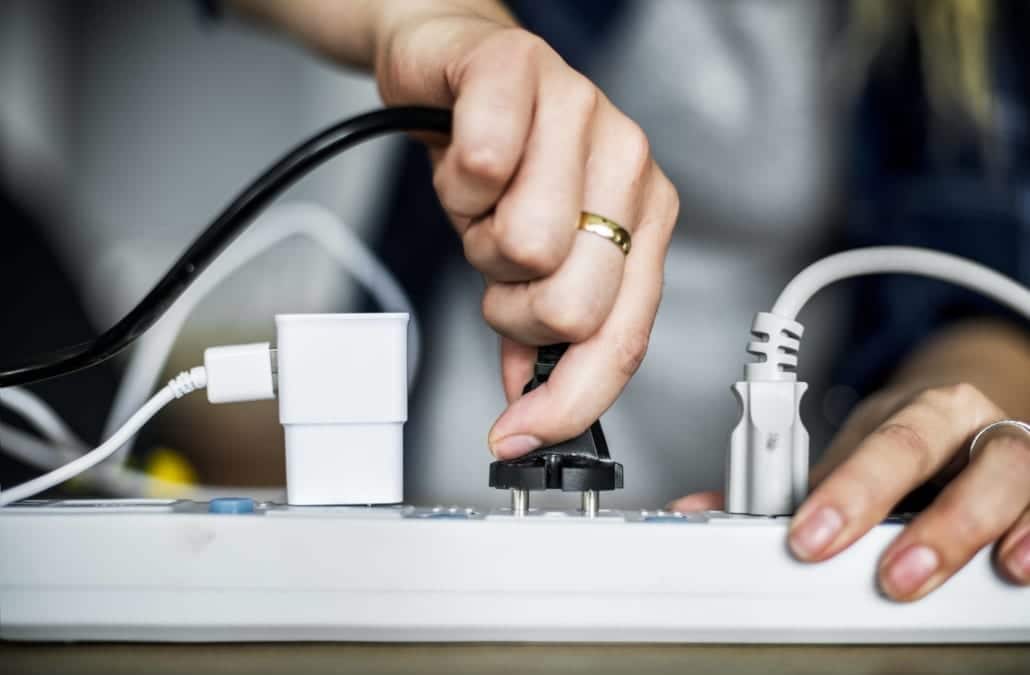
5. Don’t overload the circuit- make sure that you don’t have a lot of electrical plugs all plugged into the same place.  The recommended amount is not more than 1440 watts plugged in at one time on a 15-amp circuit.  If you overload the circuit, it can start an electrical fire.  Also, make sure you have a fire extinguisher in the garage in case there are any issues.

When to Call a Professional

If you want to add outlets and lights or a 20-amp circuit and add in wires, you need to have it inspected before dry walling.  As mentioned above, wires and electricity can be dangerous.  Calling a professional to install the drywall for you or to help with making sure your garage is safe is also a great idea.

Conclusion

Many people think of drywall as a building material in the walls but don’t realize that it is also used for sprucing up a detached garage.  We can look at your detached garage when conducting a home inspection in Chicago. 

Questions about your detached garage or need our services?  Comment below!

March 12, 2021

How to Reset a Water Heater

Water Heater

You know how cold it gets here in Chicago in the winter.  It is frigid for all of winter and it takes every ounce of us to get out from the nice warm bed when the alarm goes off to jump into the shower. If you are like many people, you turn the water on and let it warm up before jumping in.  However, what if you are standing there waiting and the water is NOT warming up?

Every thought goes through your head about what could be wrong on this cold Monday morning.  It could be the water heater reset button tripped.  How do you reset a water heater?  Check the electrical panel and flip the button to on (if it was in the off position and vice versa).  Then, push the red reset button on the water heater. If those don’t work, you will need to call a professional.

Let’s take a look at why this is important, checking the electrical panel, the purpose of the reset button, what to do if it does not come back on, maintenance of the water heater, and when to call a professional.

Why This is Important

It is important that you have hot water coming out of the faucets, appliances, and showerheads.  The warm water is not only for showers but to properly clean clothes and dishes. Water heaters last about 8-12 years but sometimes need replacing before that.

Why Water Heaters Stop Working

Often the water heater reset button trips because something is faulty on the water heater or issues such as:  

  1. The water heater unit’s thermostat is not working.
  2. The reset button is malfunctioning.
  3. The high-limit switch is not working- that is the part that keeps the water from getting too hot.  If it trips, then there is a problem with it or it is allowing the water to get to hot.
  4. There is a short in the heating element- this may allow the water to continue to heat up, however, it will trip the high-limit switch.
  5. A wire is loose somewhere in the water heater- this can cause the water to get hot and trip the high-limit switch.
  6. An electrical issue in the home.
Check the electrical panel
Electrical Panel

Check the Electrical Panel

Wander over to the electrical panel.  It is often in the garage, basement, or storage closet.  There is a circuit breaker that is labeled “Water heater.”

If the breaker is in the “off” position, flip it to “on.”  If it stays “on”, even after a few minutes, it was a minor issue and all seems to be well.

If it goes off, follow the directions below. However, if the breaker is in the “on” position, flip it to “off.”

Purpose of the Water Heater Reset Button

The purpose of this button is to stop the flow of power from the water heater.  This is a safety feature and happens when there is an issue in the water heater such as a thermostat not working properly or a power surge. The reset button keeps the water from getting too hot in the unit.

Water heater reset button: Location and How to Reset It.

Water Heater Reset Button: Location and How to Reset It

The reset button is often red and located near the thermostat or behind a metal panel that is removable on the unit. When you find it, push the reset button and then release it.

There may be a lower thermostat button also known as a second reset button. Push this and then release it.  Does the water heater trip again right away after pushing either button? Then there is an issue with a part and you will need to call a professional.

If it does not trip, replace the metal panel on the unit and go to the electrical box and flip the circuit breaker back to the “on” position.  Does the water heater turn on? Yes? This is great!

If it does not turn on, switch the breaker back to “off” and call a professional.

Possible Reason The Water Heater Won’t Work

In a water heater unit, there is an upper and lower heating unit.  If the thermometer is not working correctly, the water can become scalding hot as mentioned above.  Thus, the reset button will trip to keep the water from coming out, as this is not normal.

How a water heater works

How a Water Heater Works

The water fills in the bottom of the tank and the lower thermostat heats the water up.  As the water travels up the tank, the upper heating element continues to keep the water hot in the unit.

When the water sits in the tank, it cools down.  Then, when the water is needed, the thermostats heat it up.  There is a temperature on the high limit thermostat in the upper heating element and when the water heats to that temperature, the thermostat shuts off.

Lower Heating Element

If the lower heating element or thermostat in that area stops working, then the cold water goes up to the upper heating level.  When the water comes out in whichever appliance you are using or in the shower, the cold water is what will come out. This is because it did not heat up on its travels to the top.

Upper Heating Element

If this part stops working and the lower heating element works, you may get hot water for a little bit. However, it will turn cold once it starts pulling the water from the upper element.  It will be cold because there is no continuous heating element at the top working to keep it from getting cold. The high limit switch will trip as the water continues to heat up in the higher element to avoid it coming out scalding hot.

Maintenance of a water heater
Draining the water heater

Maintenance of a Water Heater

As with all appliances, you may be able to find this issue early if you properly maintain the unit.  

Here are a few ideas:

  1. Flush the hot water heater
  2. Whether you have gas or electric, adjust the temperature and reset
  3. Turn your gas water heater off and back on
  4. When you are traveling, set the water heater to vacation mode
  5. Tighten the drain valve if you see water leaking out
  6. Check the temperature release valve, also known as T&P or TPR
  7.  Set thermostat to 120 degrees F.
Check the anode rod in a tank style water heater
Anode rod that is corroded inside a water heater

Check the Anode Rod in a Tank Style Water Heater

Inside a tank-style water heater is an anode rod.  This keeps the middle of the tank from rusting.  Changing this out as it starts to rust will keep the water heater working longer.  How do you know if the anode rod is bad? There is a rusty smell, a sulfur smell, brown or rusty water, a gel-like substance, or the water heater is leaking or making noise.  If your water heater is 5 years old, it is time to change the rod.

Check the Age of a Water Heater

Not sure when the water heater was last replaced?  You can find out the age of a water heater by the label on the unit. Usually, the last two digits of the year are listed on the serial number.  However, if you have a Bradford water heater, it is a little more difficult to find it.

Replacing a Water Heater

There are a lot of things to think about when replacing the water heater if it comes down to that point.  The style of heater, the tank size, etc.  Take a look at this article to see what might work best for you!

When to Call a Professional

Call a professional if your water heater is tripping or not working at all. There also could be an issue with appliances sharing a circuit breaker and you want to make sure this is not the case.  A professional can let you know if there is life left in your water heater or if you need to replace it.  Additionally, if you need your water tested, it is a good idea to call a professional to make sure it is safe to drink.

Conclusion

Water heaters are essential in our lives as we use hot water for showers and our appliances to make sure they are clean.  When they are working properly, they can last 8-12 years.  If your water heater is having issues, check out the steps above and call a professional if you need assistance.  Hopefully, it is a minor issue with the reset button and you can fix it. We will inspect your water heater during our home inspections in Chicago.

Questions about your water heater or in need of our services?  Comment below.

March 2, 2021

Pages

  • About
  • Areas We Serve
  • Best Home Inspectors in Chicago, IL
  • Commercial Building Inspection Chicago, IL
  • Condo Inspections
  • Contact
  • COVID-19 Guidelines
  • Home
  • Multi-Unit Inspections
  • Our Blog
  • Preferred Contractors
  • Pricing
  • Privacy Policy
  • Radon Testing Chicago, IL
  • Sample Page
  • Schedule Your Inspection
  • Testimonials
  • Thanks
  • The Best Home Inspectors in Aurora, IL
  • The Best Home Inspectors in Evanston, IL
  • The Best Home Inspectors in Naperville, IL
  • The Best Home Inspectors in Northbrook, IL
  • Your Inspection
  • Your Report

Categories

  • Appliances
  • Attic
  • Basement
  • Deck
  • Electrical
  • Fireplace
  • Home Buyers
  • Home improvement
  • Home Inspection
  • Home Maintenance
  • HVAC
  • mold
  • Plumbing
  • Podcast
  • Real Estate
  • Resources
  • Roof
  • Safety in the Home
  • Taking Care of Your Home
  • Uncategorized
  • Water
  • Water Heater
  • Winterization

Archive

  • May 2022
  • April 2022
  • March 2022
  • February 2022
  • January 2022
  • December 2021
  • November 2021
  • October 2021
  • September 2021
  • August 2021
  • July 2021
  • June 2021
  • May 2021
  • April 2021
  • March 2021
  • February 2021
  • January 2021
  • December 2020
  • November 2020
  • October 2020
  • September 2020
  • August 2020
  • July 2020
  • June 2020
  • May 2020
  • April 2020
  • March 2020
  • February 2020
  • January 2020
  • December 2019

Providing Home Inspection Services to Cook, Lake, and DuPage Counties

We provide Inspection services to the Chicago Metro Area. Certified home inspection services including Buyers Inspections, Pre-listing Inspections, New Construction Inspections, Commercial Inspections, Radon Testing, and Sewer Scope Inspections.

View Service Area

Privacy Policy

773-242-9358
info@homeinspectiongeeks.com
Chicago, IL
Open Everyday 24 hours

Sitemap

© Copyright Home Inspection Geeks, Inc. - Managed by WolfPack Advising
  • Facebook
  • Twitter
  • Yelp
Scroll to top